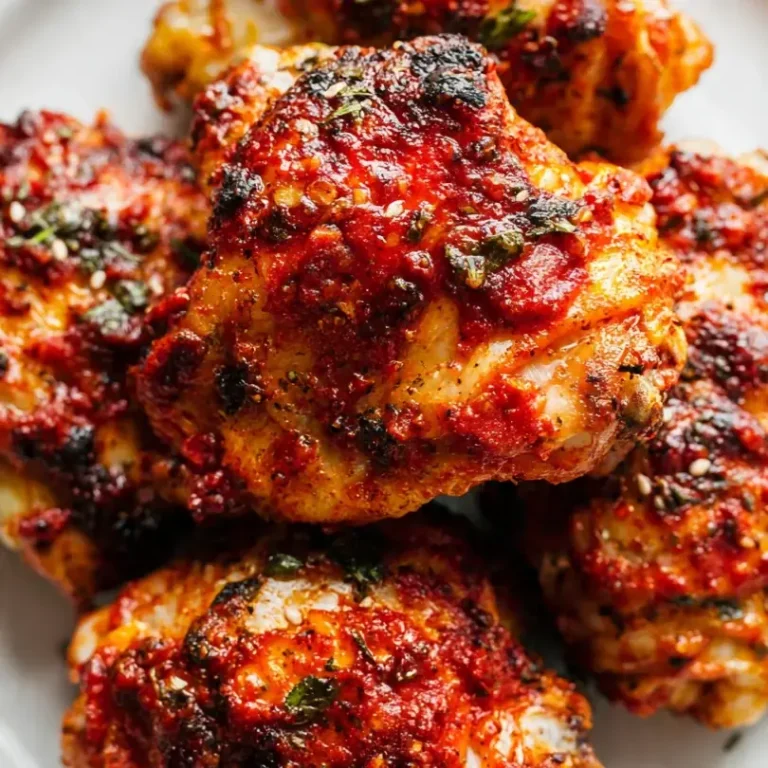
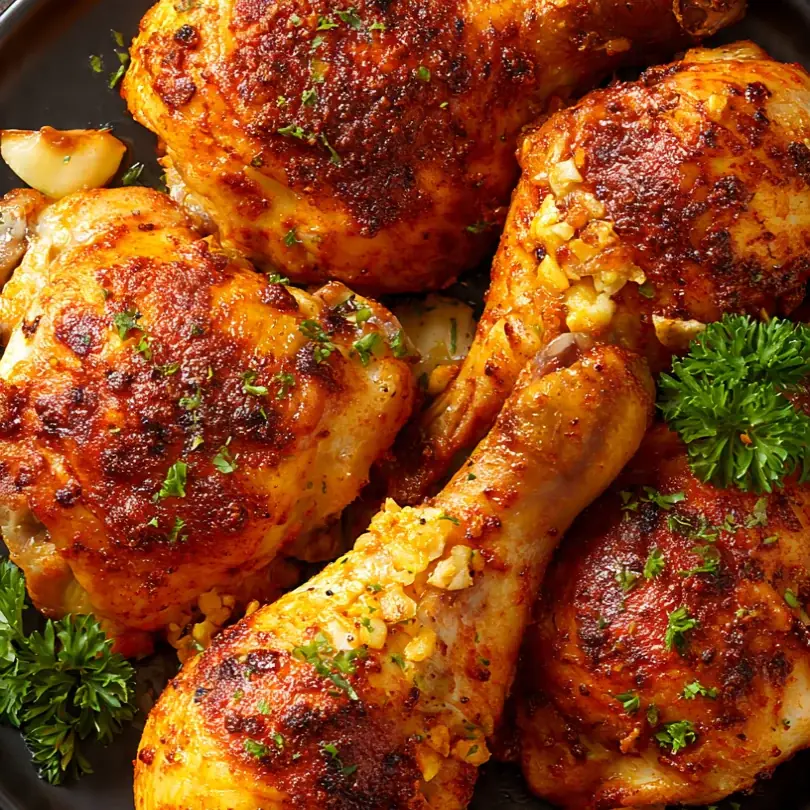
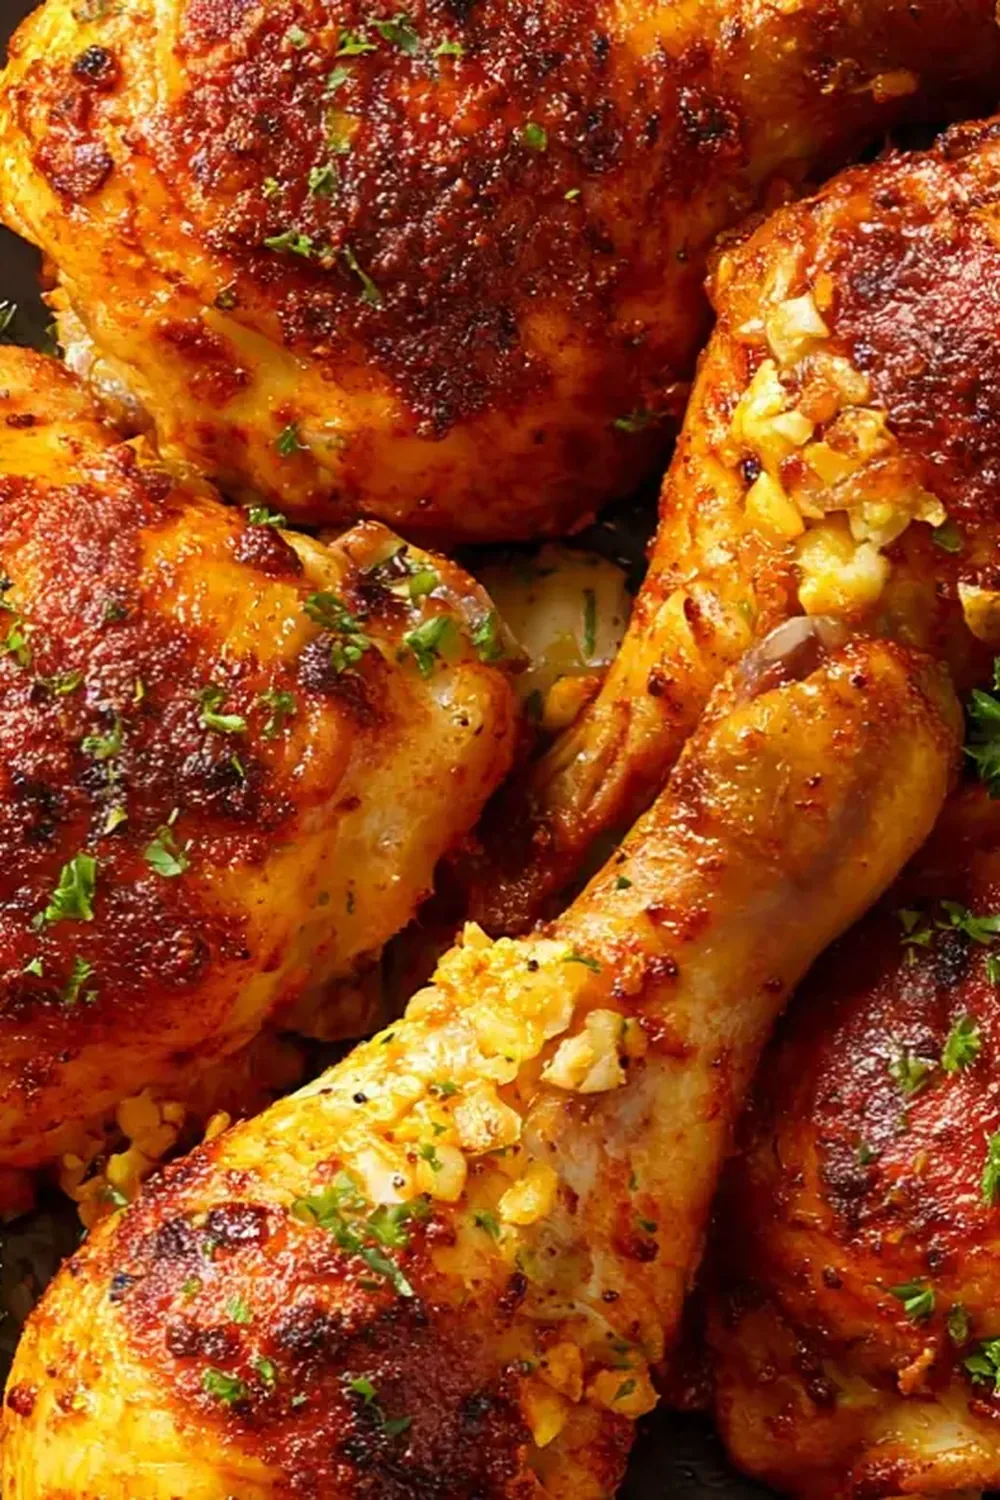
Baked Chicken Legs With Garlic & Paprika
As a home cook who loves simple, flavour-packed dinners, I’ve perfected this Baked Chicken Legs with Garlic & Paprika recipe over many evenings in my kitchen. It’s the kind of meal that fills your home with a savoury, smoky aroma and delivers incredibly tender, juicy meat with a beautifully crisp, golden skin every single time.
Recipe Overview
- Prep Time: 15 minutes
- Cook Time: 45-50 minutes
- Total Time: 1 hour 5 minutes
- Servings: 4-6 people
- Difficulty: Easy
Why You’ll Love This Baked Chicken Legs with Garlic & Paprika
- Unmatched Juiciness: Baking chicken legs at the right temperature renders the fat slowly, keeping the meat incredibly moist and succulent from the inside out.
- Deep, Smoky Flavour: The combination of sweet paprika and fresh garlic creates a robust crust that is deeply savoury without being overpowering.
- Minimal Hands-On Time: Once the chicken is seasoned and placed in the dish, the oven does all the work, freeing you up to prepare side dishes or relax.
- Budget-Friendly: Chicken legs are one of the most economical cuts of poultry, making this a fantastic option for feeding a family without stretching the budget.
- Perfectly Crispy Skin: By starting with a hot oven and using a simple technique, you achieve that irresistible, shatteringly crisp skin that everyone fights over.
Ingredients You’ll Need
- 8 chicken legs (drumsticks and thighs, about 1.2 kg total)
- 4 tablespoons olive oil
- 6 cloves garlic, finely minced
- 2 tablespoons sweet smoked paprika
- 1 tablespoon ground cumin
- 2 teaspoons dried oregano
- 1 teaspoon sea salt
- 1 teaspoon freshly ground black pepper
- 1 lemon, juiced
- 2 tablespoons tomato puree
- Fresh parsley, chopped, for garnish
Tip: For the best flavour, use smoked paprika rather than the sweet or hot variety. It adds a subtle, wood-fired depth that is unmistakable. If you only have sweet paprika, you can add a pinch of cayenne pepper for a gentle warmth.
How to Make Baked Chicken Legs with Garlic & Paprika
- Preheat your oven to 200°C (400°F). While it heats, pat the chicken legs dry with kitchen paper. This is a crucial first step — you’ll see the paper absorb any moisture, which is the enemy of crispy skin. The drier the skin, the better it will brown.
- In a large mixing bowl, combine the olive oil, minced garlic, smoked paprika, cumin, oregano, salt, pepper, lemon juice, and tomato puree. Stir until it forms a thick, fragrant paste. The colour will be a deep, rich rust red, and the smell of garlic and spices will be intoxicating.
- Add the chicken legs to the bowl and use your hands to coat each piece thoroughly. Make sure the paste gets into every crevice. You’ll feel the slick, oily mixture covering the skin. This is the moment the flavour begins to cling to the meat.
- Arrange the seasoned chicken legs in a single layer in a 9×13 inch baking dish. Do not overlap them — if the legs are crowded, they will steam rather than roast. You should hear a gentle sizzle as they touch the cold dish.
- Place the dish on the middle rack of the preheated oven and bake for 25 minutes. After this time, remove the dish carefully. You’ll notice the chicken has started to brown and the edges of the skin are beginning to crisp. The kitchen will smell of toasted paprika.
- Turn each chicken leg over using tongs. This ensures even cooking and browning. The underside will look pale and soft compared to the golden top. Return the dish to the oven for another 20-25 minutes.
- Check for doneness. The internal temperature should reach 74°C (165°F) when inserted into the thickest part of the leg, away from the bone. The skin will be deep golden brown, almost caramelised in spots, and the juices will run clear when you pierce the meat. The sound of the crispy skin as you lift a leg from the dish is deeply satisfying.
- Remove from the oven and let the chicken rest in the dish for 5 minutes. This allows the juices to redistribute. Sprinkle with fresh parsley before serving. The contrast of the green parsley against the deep red-brown chicken is beautiful.
Tips From My Kitchen
- Pat the skin bone-dry: Moisture is the primary barrier to crispy skin. By thoroughly drying the chicken with paper towels, you allow the fat under the skin to render and crisp up beautifully. If the skin is damp, it will steam and become rubbery.
- Don’t skip the resting time: After baking, the juices inside the chicken are fiercely hot and moving rapidly. If you cut into it immediately, those juices will flood onto the plate, leaving the meat dry. A 5-minute rest lets the fibres relax and reabsorb the moisture, ensuring every bite is succulent.
- Use fresh garlic, not pre-minced: Pre-minced garlic from a jar often has a sharp, bitter taste and a watery texture. Freshly minced garlic releases natural oils that meld with the paprika and olive oil to create a far more rounded, aromatic flavour. You’ll notice the difference in the final taste.
- Bake on a wire rack if possible: Placing the chicken legs on a wire rack set inside the baking dish allows hot air to circulate all around each piece. This results in evenly crisp skin on the bottom as well as the top, preventing a soggy underside. If you don’t have a rack, turning the chicken halfway through is essential.
- Let the paste sit for 10 minutes before using: After mixing the oil, garlic, paprika, and other ingredients, let the paste rest for about 10 minutes. This allows the dried herbs and spices to rehydrate and bloom in the oil, releasing their full potential. The colour will deepen, and the aroma will become more complex.
Equipment You’ll Need
- 9×13 inch baking dish (or similar sized roasting pan)
- Aluminium foil (for tenting if needed, though not required)
- Mixing bowls (one large, one small for the paste)
- Sharp knife or kitchen shears (for trimming any excess fat)
- Tongs (for turning the chicken safely)
- Instant-read meat thermometer (for guaranteed doneness)
Common Mistakes to Avoid
- Overcrowding the pan: If you cram too many chicken legs into one dish, they will release steam as they cook. This traps moisture against the skin, preventing it from crisping and making the meat stew rather than roast. Always leave a little space between each piece. If necessary, use two dishes or bake in batches.
- Wrong temperature: Baking at too low a temperature (below 180°C) will dry out the chicken before the skin has a chance to brown. Conversely, a temperature that is too high (above 220°C) can burn the garlic and paprika, leaving them bitter while the inside remains undercooked. Stick to 200°C for the perfect balance.
- Skipping the rest time: This is the most common mistake I see. The temptation to serve immediately is strong, but resisting it is what separates good chicken from truly exceptional chicken. Resting allows the muscle fibres to relax, locking in the juices and ensuring a tender, moist result.
Delicious Variations to Try
- Spicy Version: Add 1 teaspoon of cayenne pepper or 2 finely chopped fresh red chillies to the spice paste. For an even deeper heat, stir in a tablespoon of harissa paste. The smoky paprika will balance the fire beautifully.
- Vegetarian/Vegan Option: Substitute the chicken legs with large portobello mushrooms, cauliflower steaks, or firm tofu. Marinate them in the same garlic and paprika paste, then bake at 190°C for 20-25 minutes until tender and slightly charred. The smoky, garlicky flavour works wonderfully with plant-based proteins.
- Different Protein: This marinade is incredibly versatile. Use it on chicken thighs, drumsticks, or even a whole spatchcocked chicken. It also works beautifully on turkey drumsticks or lamb chops — just adjust the baking time accordingly. For a quicker option, try it with chicken breast fillets, but reduce the cooking time to 20-25 minutes to prevent drying out.
What to Serve With Baked Chicken Legs with Garlic & Paprika
- Fluffy steamed rice or buttery mashed potatoes to soak up the pan juices
- A crisp green salad with a lemony vinaigrette to cut through the richness
- Roasted vegetables like carrots, courgettes, or bell peppers tossed in olive oil and salt
- Warm crusty bread for dipping into the savoury sauce
- A simple side of steamed green beans or sautéed spinach
Frequently Asked Questions
Baked Chicken Legs with Garlic & Paprika
Ingredients
Method
- Preheat your oven to 200°C (400°F). While it heats, pat the chicken legs dry with kitchen paper. This is a crucial first step — you'll see the paper absorb any moisture, which is the enemy of crispy skin. The drier the skin, the better it will brown.
- In a large mixing bowl, combine the olive oil, minced garlic, smoked paprika, cumin, oregano, salt, pepper, lemon juice, and tomato puree. Stir until it forms a thick, fragrant paste. The colour will be a deep, rich rust red, and the smell of garlic and spices will be intoxicating.
- Add the chicken legs to the bowl and use your hands to coat each piece thoroughly. Make sure the paste gets into every crevice. You'll feel the slick, oily mixture covering the skin. This is the moment the flavour begins to cling to the meat.
- Arrange the seasoned chicken legs in a single layer in a 9x13 inch baking dish. Do not overlap them — if the legs are crowded, they will steam rather than roast. You should hear a gentle sizzle as they touch the cold dish.
- Place the dish on the middle rack of the preheated oven and bake for 25 minutes. After this time, remove the dish carefully. You'll notice the chicken has started to brown and the edges of the skin are beginning to crisp. The kitchen will smell of toasted paprika.
- Turn each chicken leg over using tongs. This ensures even cooking and browning. The underside will look pale and soft compared to the golden top. Return the dish to the oven for another 20-25 minutes.
- Check for doneness. The internal temperature should reach 74°C (165°F) when inserted into the thickest part of the leg, away from the bone. The skin will be deep golden brown, almost caramelised in spots, and the juices will run clear when you pierce the meat. The sound of the crispy skin as you lift a leg from the dish is deeply satisfying.
- Remove from the oven and let the chicken rest in the dish for 5 minutes. This allows the juices to redistribute. Sprinkle with fresh parsley before serving. The contrast of the green parsley against the deep red-brown chicken is beautiful.
Notes
I make this at least once a week — it’s become a family favourite. Friends always ask me for this recipe after trying it at dinner parties. There’s something so satisfying about pulling a tray of perfectly roasted, garlicky chicken from the oven. The deep red-brown colour, the fragrant steam, and the promise of that first crispy, juicy bite never get old. I hope this recipe brings as much joy to your table as it does to mine. If you give it a try, I’d love to hear how it turned out in the comments below. Happy cooking! And for more hearty meals like this, be sure to browse our Dinner collection, or check out our Blog for more inspiration.